Feature Flags and A/B Tests with Deno, Hono, and GrowthBook
The only requirement for this tutorial is to install Deno. The installation process is straightforward, and you'll be ready to follow along easily.
Introduction
In this guide, we’ll use Deno, Hono, and GrowthBook to build a landing page for a fictional FinTech app called Bayes Bank. With this setup, we can use feature flags and A/B testing on a server-rendered landing page to test and deliver different experiences to users.
All tutorial code is available in our Examples repo.

What are Deno, Hono, and GrowthBook?
- Deno is a JavaScript and TypeScript runtime developed by Ryan Dahl (creator of Node.js) that simplifies the development process and resolves many limitations from Node.
- Hono is a fast, lightweight web framework that works like an updated, modernized Express, optimized for Deno and other runtimes.
- GrowthBook (that’s us!) is an open-source platform for feature flags and A/B testing. We offer a user-friendly interface for creating and managing flags, running tests, and analyzing results.
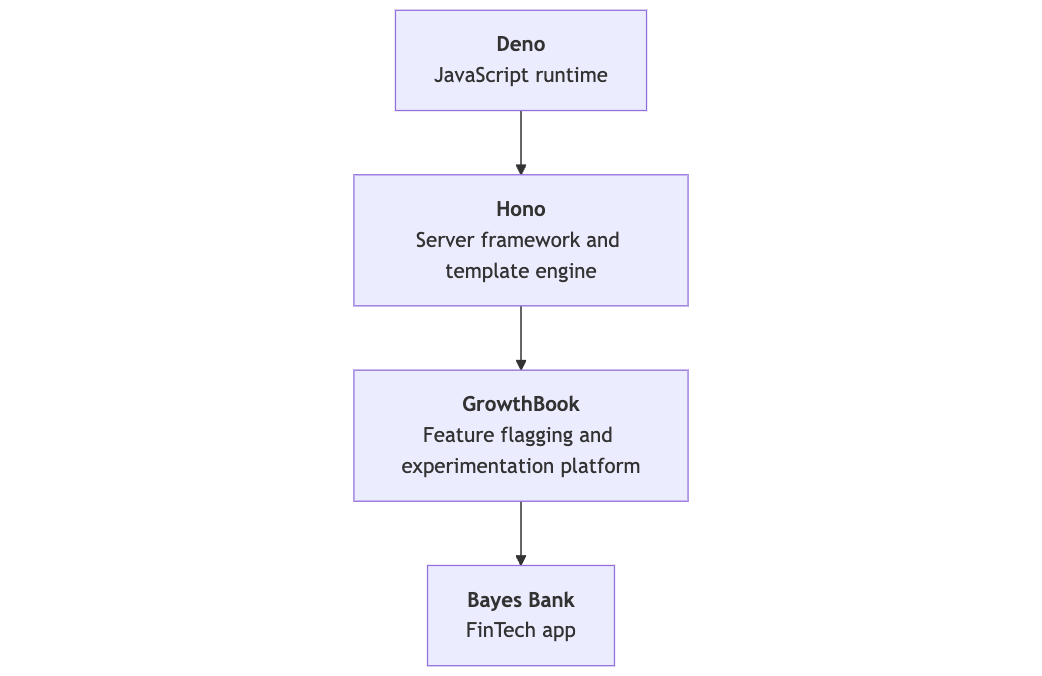
In this tutorial, learn how to use these technologies to build a feature-flagged landing page. Here’s a diagram that shows how these technologies fit together:
Project setup
Initialize Hono
Run the following command to create a new Hono project, selecting Deno as your runtime. (Optionally, substitute my-app for your project’s name.)
deno run -A npm:create-hono@latest my-app
This command creates a new directory with the following files:
README.md: Contains basic instructions for starting the server.deno.json: Defines project dependencies and configuration.main.ts: The core file where your application logic will reside.
Let’s take advantage of the fact that Hono can support JSX out of the box and rename main.ts to main.tsx.
Install dependencies
Next, install GrowthBook and Tailwind CSS:
deno add jsr:@growthbook/growthbook npm:tailwindcss
The deno add command registers dependencies via your import map in deno.json. The prefix before package names indicates which registry the package comes from.
The GrowthBook JS SDK is now available on the JSR. Learn more in our announcement post.
Configure Tailwind
Generate a Tailwind config:
deno run -A npm:tailwindcss init -p
This creates postcss.config.js and tailwind.config.js. Update the Tailwind config to target the right files:
/** @type {import('tailwindcss').Config} */
module.exports = {
  content: ["./**/*.{js,ts,jsx,tsx}"],
  theme: {
    extend: {},
  },
  plugins: [],
};
Create a src/css folder and add a new file called input.css. Add Tailwind directives to generate base styles:
@tailwind base;
@tailwind components;
@tailwind utilities;
Configure development scripts
Add the following tasks to deno.json to streamline development:
{
  "imports": {
    "@growthbook/growthbook": "jsr:@growthbook/growthbook@^1.2.2",
    "hono": "jsr:@hono/hono@^4.6.8",
    "tailwindcss": "npm:tailwindcss@^3.4.14"
  },
  "tasks": {
    "start": "deno run --allow-net main.tsx",
    "watch:jsx": "deno run -A --watch main.tsx",
    "watch:css": "deno run -A npm:tailwindcss -i src/css/input.css -o static/style.css --watch",
    "dev": "deno task watch:css & deno task watch:jsx"
  },
  "compilerOptions": {
    "jsx": "precompile",
    "jsxImportSource": "hono/jsx"
  }
}
Running deno task dev will watch for file changes, automatically restart the server, and recompile CSS.
Building the app layout
To build the landing page, create a folder in src called components. Add the following components for the page layout: Header.tsx, Hero.tsx, Copy.tsx, and Footer.tsx.
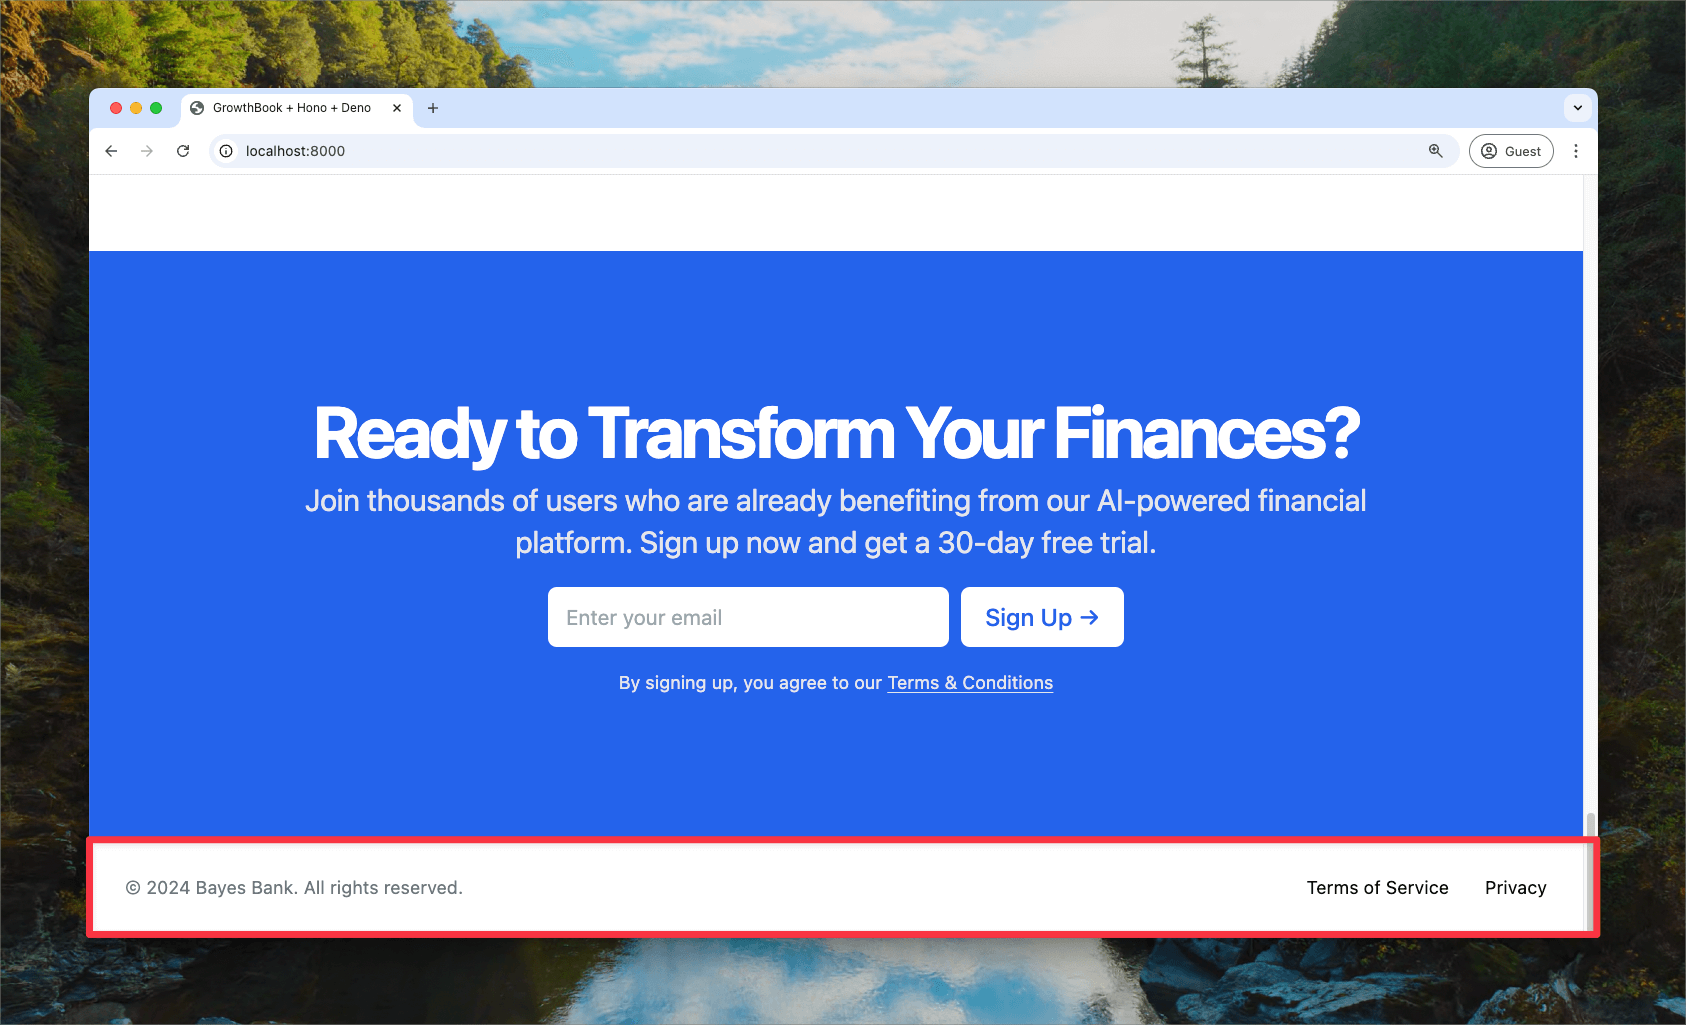
All of these components are available in the demo repo. Here’s the Footer component as an example:
import { Props } from "../../main.tsx";

export const Footer = ({ companyName }: Omit<Props, "gb">) => {
  return (
    <footer className="flex flex-col gap-2 sm:flex-row py-6 w-full shrink-0 items-center px-4 md:px-6 border-t">
      <p className="text-xs text-gray-500">
        © 2024 {companyName}. All rights reserved.
      </p>
      <nav className="sm:ml-auto flex gap-4 sm:gap-6">
        <a className="text-xs hover:underline underline-offset-4" href="#">
          Terms of Service
        </a>
        <a className="text-xs hover:underline underline-offset-4" href="#">
          Privacy
        </a>
      </nav>
    </footer>
  );
};
And here’s the rendered component:
Main server code
The code generated when initializing Hono instantiates a new app, defines a route handler for the homepage, and starts the server.
import { Hono } from 'hono';

const app = new Hono();

app.get('/', (c) => c.text('Hello Hono!'));

Deno.serve(app.fetch);
Now, import the Navbar and Footer components and build a layout component for reuse:
import type { PropsWithChildren } from "hono/jsx";
import { Navbar } from "./src/components/Navbar.tsx";
import { Footer } from "./src/components/Footer.tsx";

export function Layout({ companyName, children }: PropsWithChildren<{ companyName: string }>) {
  return (
    <html>
      <head lang="en">
        <meta charset="utf-8" />
        <meta name="viewport" content="width=device-width, initial-scale=1" />
        <title>Deno + Hono + GrowthBook</title>
        <link rel="stylesheet" href="/static/style.css" />
      </head>
      <body>
        <Navbar companyName={companyName} />
        {children}
        <Footer companyName={companyName} />
      </body>
    </html>
  );
}
Add Hero.tsx and Copy.tsx components to define the page content, then create the Page component to bring it all together.
const Page = ({ companyName }) => (
  <Layout companyName={companyName}>
    <Hero />
    <Copy companyName={companyName} />
  </Layout>
);
Finally, modify the route to serve this page:
app.get("/", (c) => c.html(<Page companyName="Bayes Bank" />));
Find the final version of the main.tsx file in the demo repo.
Integrating GrowthBook
Create a file called growthbookMiddleware.ts to use feature flags and A/B tests in the app:
import { GrowthBook } from "@growthbook/growthbook";
import { getCookie, setCookie } from "hono/cookie";
import { createMiddleware } from "hono/factory";

export const growthbookMiddleware = createMiddleware<{
  Variables: {
    gb: GrowthBook;
  };
}>(async (c, next) => {
  // Instantiate GrowthBook with your connection details
  const gb = new GrowthBook({
    apiHost: "https://cdn.growthbook.io", // Update with your API host
    clientKey: "YOUR-SDK-KEY",
    trackingCallback: (experiment, result) => {
      console.log("Experiment Viewed", { experiment, result }); // Update function to send experiment exposure to your analytics platform
    },
  });

  // Get a preexisting cookie (ensures users are kept in the same variant)
  let uuid = getCookie(c, "gb_uuid");

  // Create the UUID/cookie if it doesn't exist
  if (!uuid) {
    uuid = crypto.randomUUID();
    setCookie(c, "gb_uuid", uuid);
  }

  // Pass GrowthBook the ID and other attributes as needed
  gb.setAttributes({
    id: uuid,
    // ...
  });

  // Initialize GrowthBook
  await gb.init({ timeout: 1000 });

  // Add the instance to the context
  c.set("gb", gb);

  // Continue the req/response
  await next();

  // Clean up once the request closes
  gb.destroy();
});
Add this middleware to your route in main.tsx:
import { growthbookMiddleware } from "./growthbookMiddleware.ts";

app.get("/", growthbookMiddleware, (c) => {
  const gbInstance = c.var.gb;
  return c.html(<Page companyName="Bayes Bank" gb={gbInstance} />);
});
Using feature flags in the app
Pass gb to components to conditionally render elements based on feature flags. For Bayes Bank, we want to test different headlines on the landing page to see if they boost conversions.
Update the text in Hero.tsx to be handled by a feature flag:
export function Hero({ gb }: Props) {
  const headline = gb.getFeatureValue("headline", "Revolutionize Your Finances with AI");

  return <h1 className="text-3xl font-bold">{headline}</h1>;
}
GrowthBook’s getFeatureValue method takes the flag’s ID (headline) and a fallback value, in case the app can’t reach GrowthBook’s API. Now, different headlines will appear based on how the feature flag is configured in GrowthBook.
Configuring GrowthBook
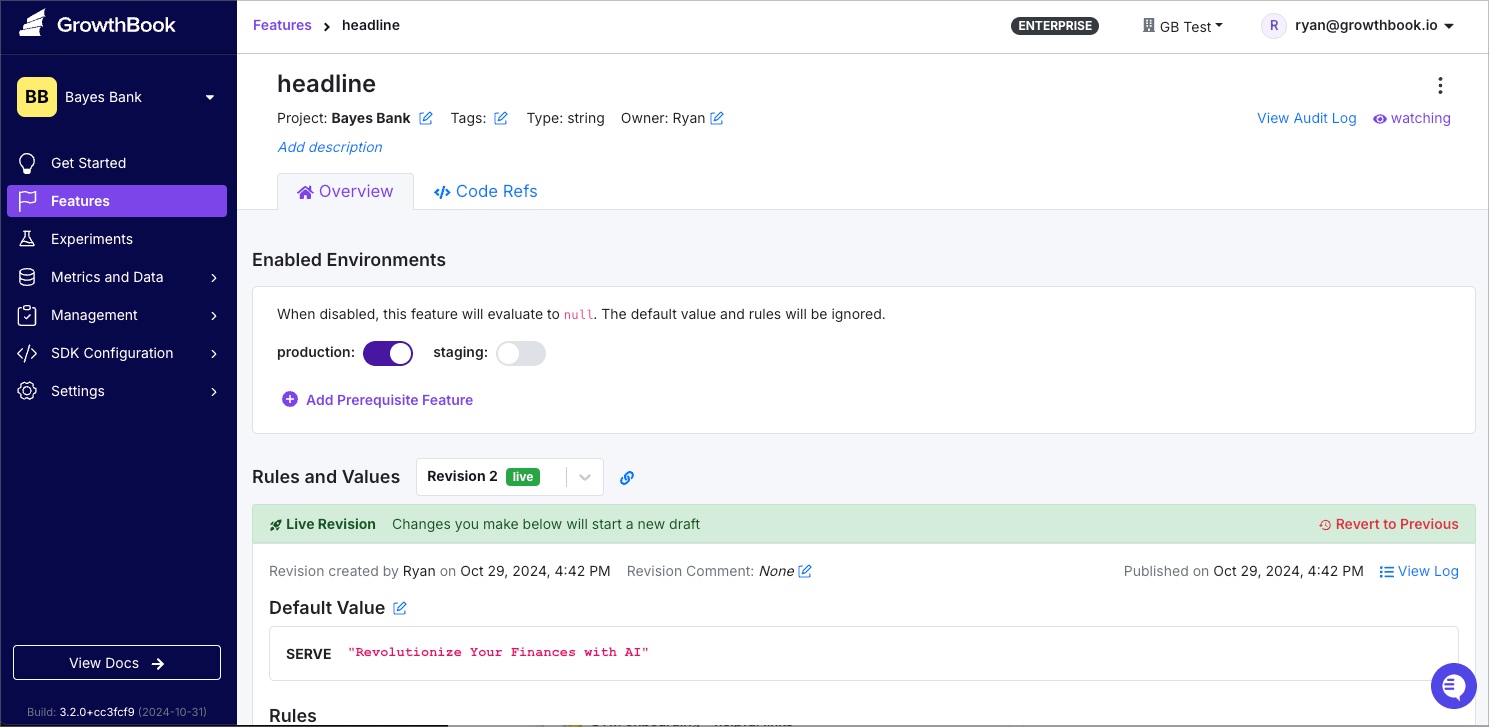
In GrowthBook, create a feature flag called headline and set its type to “String” with a default value of “Revolutionize Your Finances with AI.”
Next, click Add Rule → Experiment to set up an A/B test.
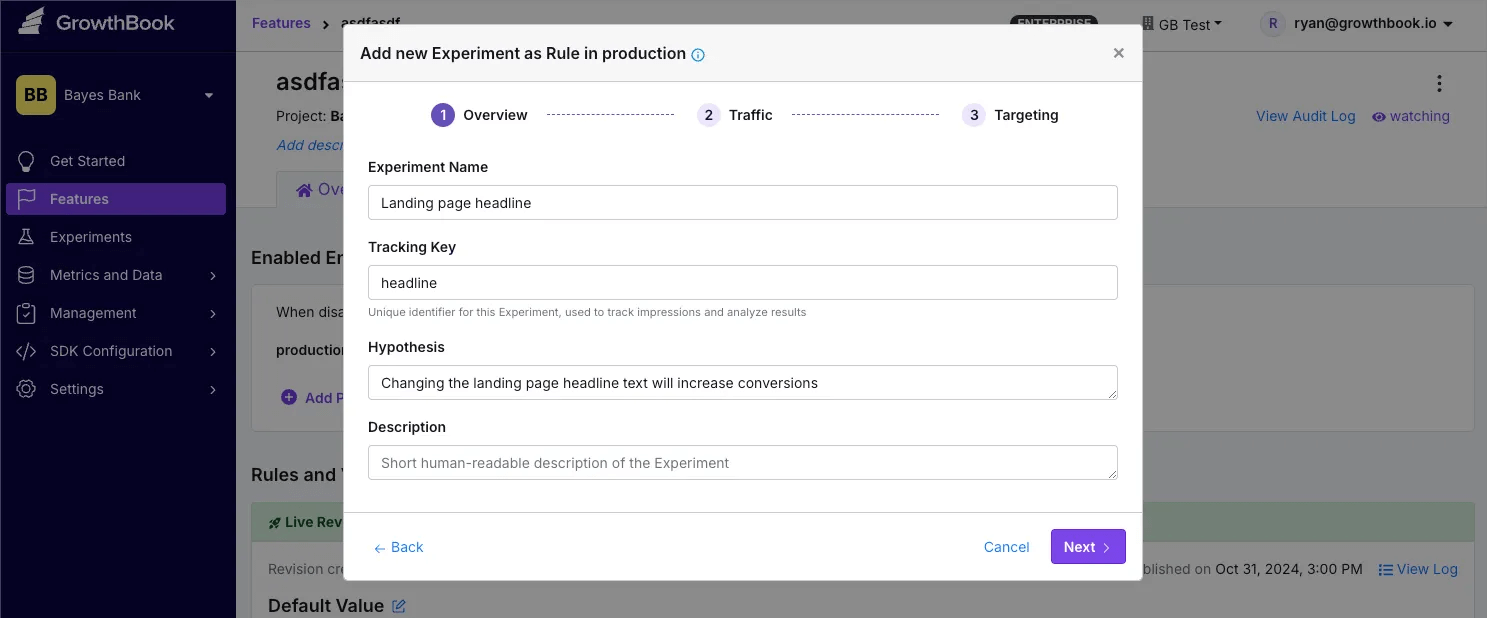
Set variation 0 to the default value, “Revolutionize Your Finances with AI,” and variation 1 to "Save Money and Grow Your Wealth with AI." Click Save to start the experiment 🧪
Below, check out the control and variation, all rendered server side!


Summary
In this tutorial, we explored how to build a dynamic landing page for Bayes Bank using Deno, Hono, and GrowthBook. By leveraging these modern technologies, we created a server-rendered application that incorporates feature flags and A/B testing, enabling us to test different user experiences seamlessly.
With the fundamentals covered, you now have the tools to expand on this project, experiment with additional features, and fine-tune the user experience for Bayes Bank.