Sanity with GrowthBook
This comprehensive tutorial will walk you through setting up Sanity with GrowthBook for A/B testing in a Next.js application. You'll learn how to create content variations with Sanity and use GrowthBook for feature flag experiments like in the example below.
Sanity is a real-time content backend for all your text and assets. Sanity Studio is a flexible, multiplayer TypeScript CMS which is configured with code and deployed to your authors. In this guide you’ll embed it as part of your Next.js application, but it can also be deployed standalone.
GrowthBook (that's us!) is open source feature flag management and experimentation platform that works great with your stack—including Sanity.
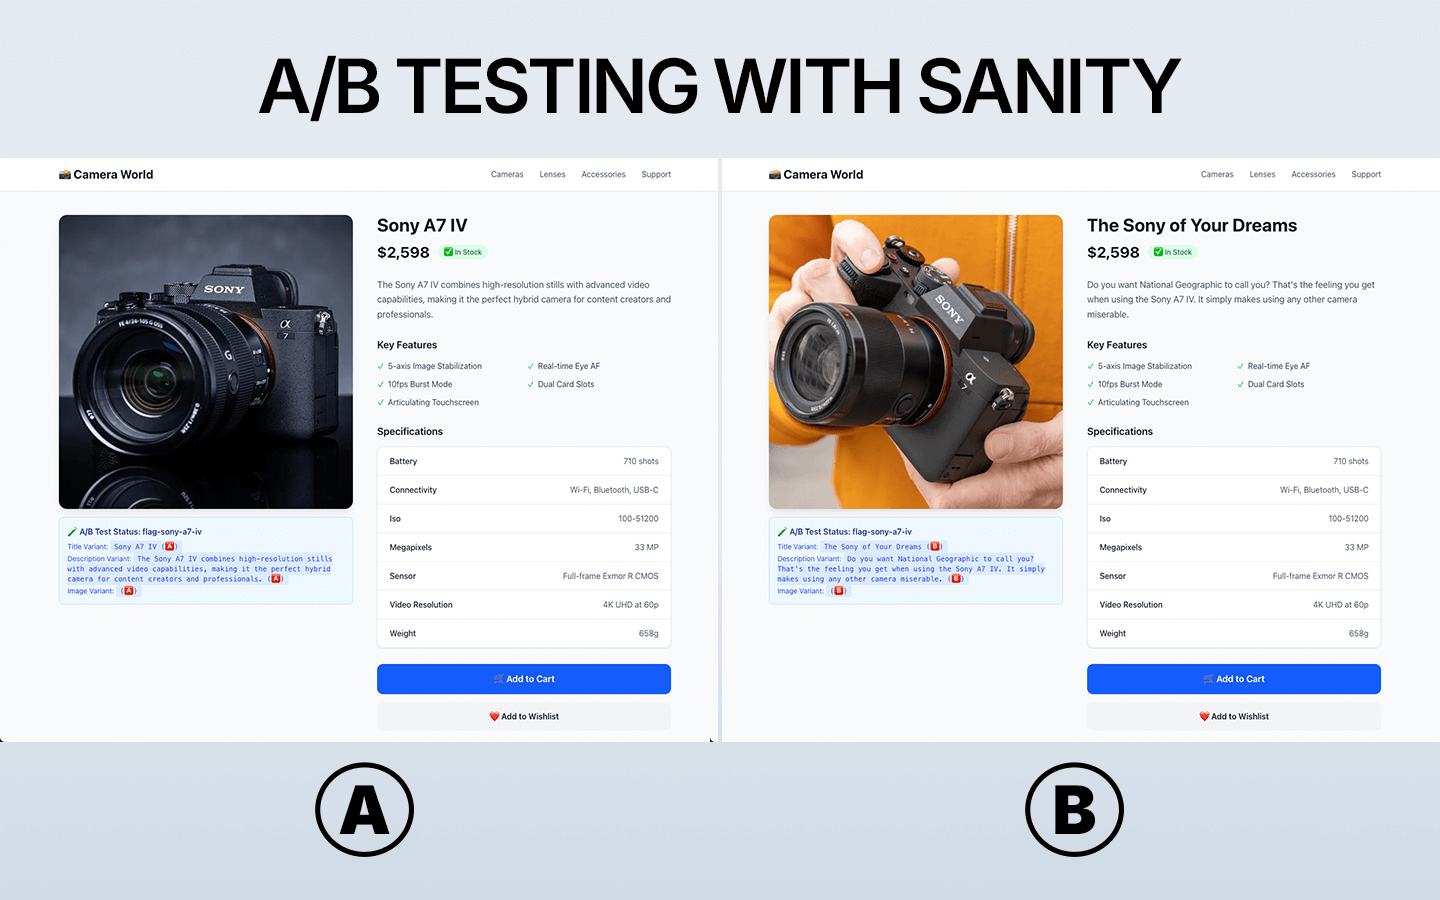
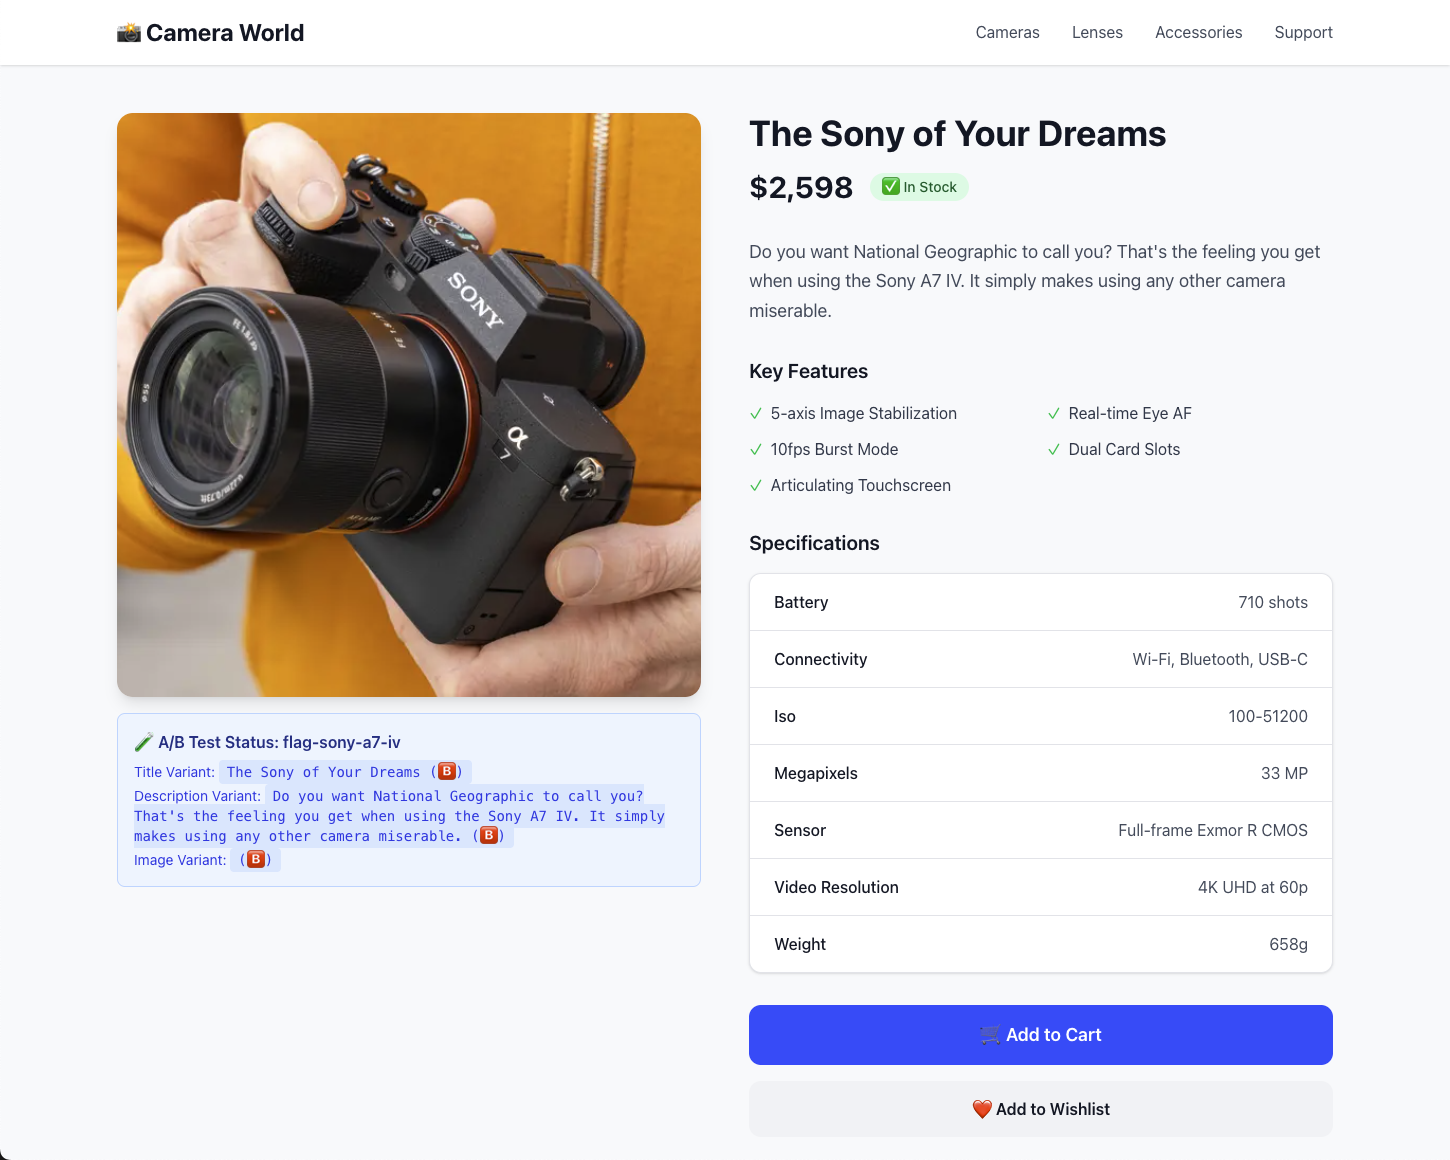
For the purposes of this guide, we'll be creating an A/B test for the product page of a fictional camera store, Camera World.
Prerequisites
- Node.js 20+ installed
- A GrowthBook account
- A Sanity account
- Basic knowledge of Next.js and React
Video Tutorial
Set up Next.js and Sanity
Install Next.js
Already have a Next.js project? Skip to the next section.
- npm
- Yarn
- pnpm
- Bun
npx create-next-app@latest my-sanity-growthbook-app --typescript --tailwind --eslint --app
yarn dlx create-next-app@latest my-sanity-growthbook-app --typescript --tailwind --eslint --app
pnpm dlx create-next-app@latest my-sanity-growthbook-app --typescript --tailwind --eslint --app
bun x create-next-app@latest my-sanity-growthbook-app --typescript --tailwind --eslint --app
Install Sanity
Inside your Next.js project, install Sanity:
- npm
- Yarn
- pnpm
- Bun
npx sanity@latest init
yarn dlx sanity@latest init
pnpm dlx sanity@latest init
bun x sanity@latest init
Choose the default options when prompted. This creates Sanity Studio inside your Next.js project (accessible at /studio) and sets up the necessary config files.
You’ll need a free Sanity account to complete this guide, if you do not yet have one, you will be prompted to create one after running this command.
Add the Sanity Personalization Plugin
Sanity offers a plugin for personalization that includes a direct integration with GrowthBook. This plugin allows you to create content variations within Sanity and use GrowthBook for feature flag experiments.
Install the plugin:
- npm
- Yarn
- pnpm
- Bun
npm install @sanity/personalization-plugin
yarn add @sanity/personalization-plugin
pnpm add @sanity/personalization-plugin
bun add @sanity/personalization-plugin
Update your Sanity config
In your Next.js project, update sanity.config.ts to include the personalization plugin. Note that the fields listed below are the existing defined fields that you are extending to be able to experiment on. (Changes highlighted in the code block below.)
"use client";

/**
 * This configuration is used to for the Sanity Studio that’s mounted on the `/app/studio/[[...tool]]/page.tsx` route
 */

import { visionTool } from "@sanity/vision";
import { defineConfig } from "sanity";
import { structureTool } from "sanity/structure";
import { fieldLevelExperiments } from "@sanity/personalization-plugin/growthbook";

// Go to https://www.sanity.io/docs/api-versioning to learn how API versioning works
import { apiVersion, dataset, projectId } from "./sanity/env";
import { schema } from "./sanity/schemaTypes";
import { structure } from "./sanity/structure";

export default defineConfig({
  basePath: "/studio",
  projectId,
  dataset,
  // Add and edit the content schema in the './sanity/schemaTypes' folder
  schema,
  plugins: [
    structureTool({ structure }),
    // Vision is for querying with GROQ from inside the Studio
    // https://www.sanity.io/docs/the-vision-plugin
    visionTool({ defaultApiVersion: apiVersion }),
    fieldLevelExperiments({
      fields: ["string", "image"],
      environment: "<SPECIFY_ENVIRONMENT>", // Change to your GrowthBook environment
      project: "<SPECIFY_PROJECT_ID>", // Optional: specify your GrowthBook project ID
    }),
  ],
});
Add Experiment Fields to Your Sanity Schema
With the personalization plugin installed, you can now add experiment fields to your Sanity schema.
Create a new file sanity/schemaTypes/camera.ts:
import { defineField, defineType } from "sanity";

export const camera = defineType({
  name: "camera",
  title: "Camera Product",
  type: "document",
  fields: [
    defineField({
      name: "slug",
      type: "slug",
      options: {
        source: "title.default",
      },
    }),
    defineField({
      name: "title",
      type: "experimentString",
    }),
    defineField({
      name: "price",
      type: "number",
    }),
    defineField({
      name: "image",
      type: "experimentImage",
    }),
    defineField({
      name: "description",
      type: "experimentString",
    }),
    defineField({
      name: "specs",
      title: "Specifications",
      type: "object",
      fields: [
        { name: "megapixels", title: "Megapixels", type: "string" },
        { name: "sensor", title: "Sensor Type", type: "string" },
        { name: "iso", title: "ISO Range", type: "string" },
        { name: "videoResolution", title: "Video Resolution", type: "string" },
        { name: "battery", title: "Battery Life", type: "string" },
        { name: "weight", title: "Weight", type: "string" },
        { name: "connectivity", title: "Connectivity", type: "string" },
      ],
    }),
    defineField({
      name: "features",
      title: "Key Features",
      type: "array",
      of: [{ type: "string" }],
      options: { layout: "tags" },
    }),
    defineField({
      name: "inStock",
      type: "boolean",
      initialValue: true,
    }),
    defineField({
      name: "category",
      type: "string",
      options: {
        list: [
          { title: "DSLR", value: "dslr" },
          { title: "Mirrorless", value: "mirrorless" },
          { title: "Point & Shoot", value: "pointshoot" },
          { title: "Action Camera", value: "action" },
          { title: "Instant Camera", value: "instant" },
        ],
      },
    }),
  ],
  preview: {
    select: {
      title: "title.default",
      subtitle: "category",
      media: "image.default",
    },
  },
});
The schema uses experimentString and experimentImage field types (highlighted in the code block above) provided by the personalization plugin. These allow you to create content variations with Sanity and use GrowthBook for experiments.
Import the schema into your sanity/schemaTypes.ts file:
import { type SchemaTypeDefinition } from "sanity";
import { camera } from "./camera";

export const schema: { types: SchemaTypeDefinition[] } = {
  types: [camera],
};
Add Queries to Fetch Experiment Content
Create a new file sanity/lib/queries.ts to store your GROQ query:
import { defineQuery } from "next-sanity";

export const CAMERA_PRODUCT_QUERY = defineQuery(`
  *[_type == "camera" && slug.current == $slug][0]{
    "title": coalesce(
      title.variants[experimentId == $titleExperiment && variantId == $titleVariant][0].value,
      title.default
    ),
    "image": coalesce(
      image.variants[experimentId == $imageExperiment && variantId == $imageVariant][0].value,
      image.default
    ),
    slug,
    "description": coalesce(
      description.variants[experimentId == $descriptionExperiment && variantId == $descriptionVariant][0].value,
      description.default
    ),
    specs,
    features,
    inStock,
    category,
    price

  }
`);
This query fetches the experiment content and serves the appropriate variation to the user.
Run npx sanity@latest schema extract && npx sanity@latest typegen generate in your project to generate types for your queries/schema automatically.
Configure GrowthBook
In this section, we'll create an SDK connection, feature flag, and experiment in GrowthBook.
- The SDK connection links GrowthBook to your Next.js app.
- Feature flags live in your codebase and control which code is executed.
- Experiments are defined as feature flag rules and are used to test different variations.
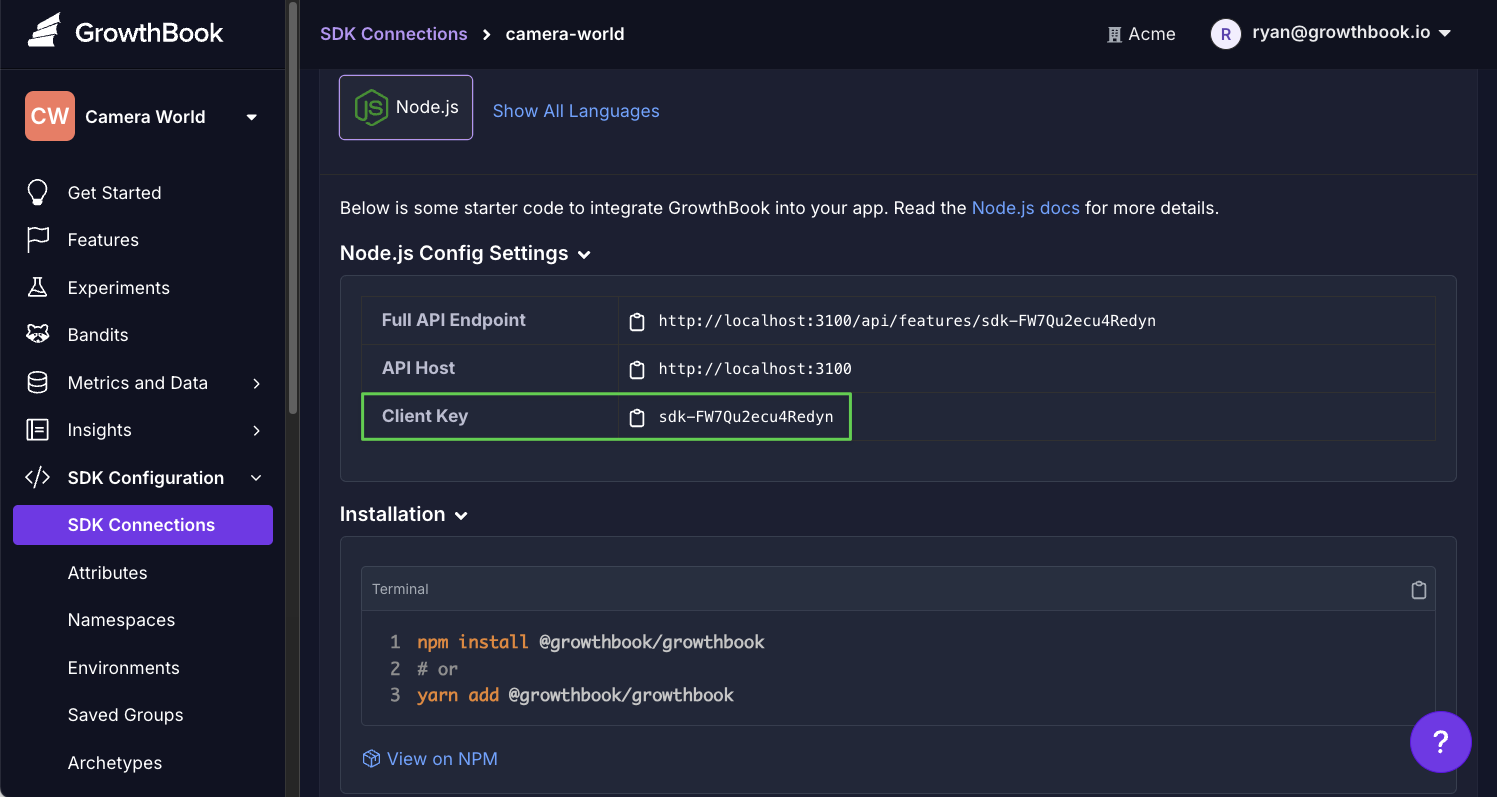
Create a GrowthBook SDK Connection
-
In GrowthBook, go to SDK Configuration → SDK Connections and click Add SDK Connection.
-
Choose Node.js and click Save.
-
Copy the Client Key and add it to your
.env.localin Next.js. (You'll also see the environment variables for Sanity in the file.)
GROWTHBOOK_CLIENT_KEY=<YOUR_CLIENT_KEY>
Remember to update environment variables with your hosting provider when you deploy your app.
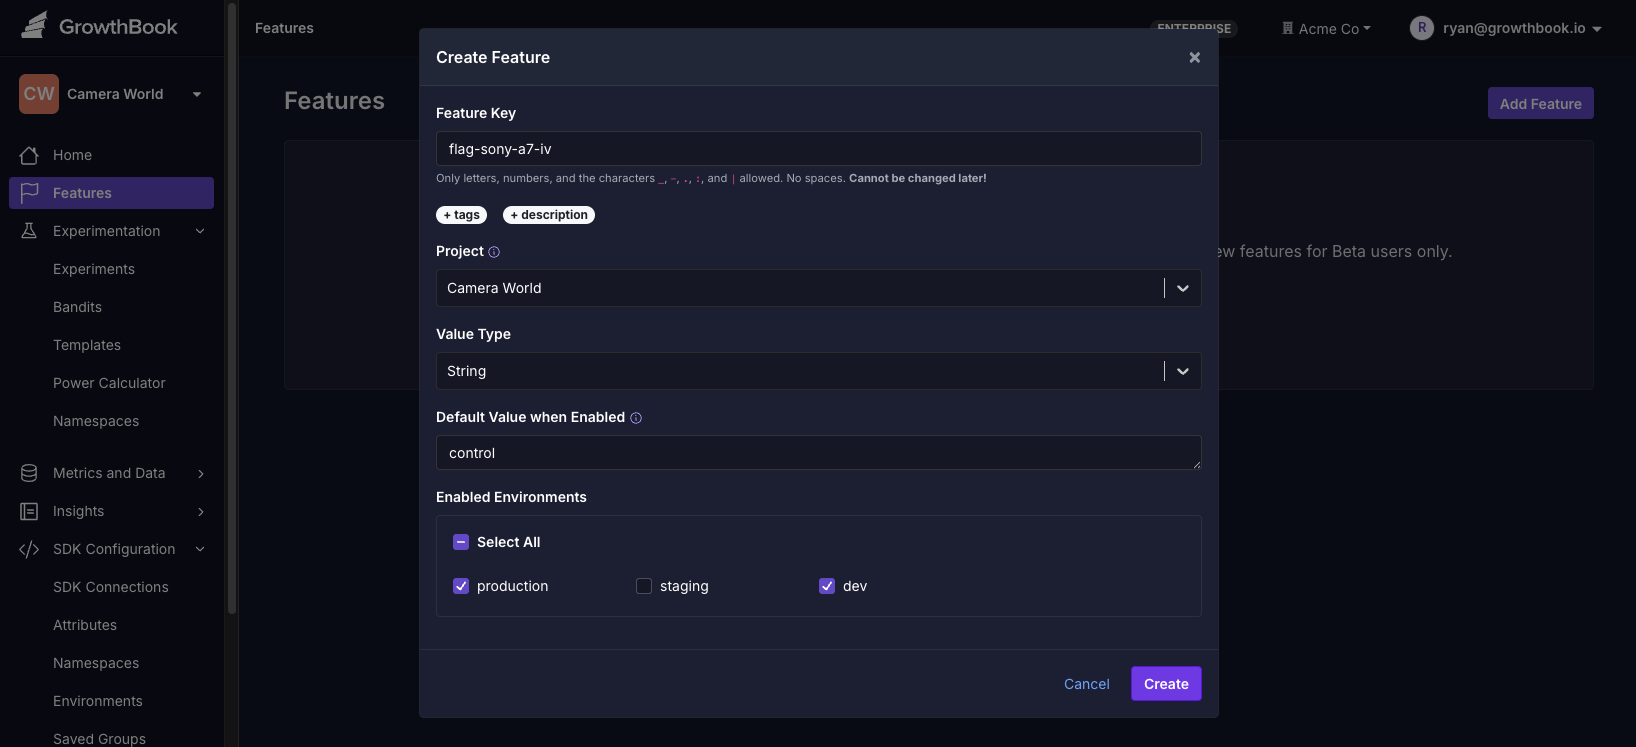
Create a Feature Flag
For our Camera World example, let's test the title, description, and image for the Sony A7 IV product page.
-
In GrowthBook, go to Features and click Add Feature.
-
Give the feature a name, like
flag-sony-a7-iv. -
Set the value type to String.
-
Set the default value to "control".
-
Save the feature.
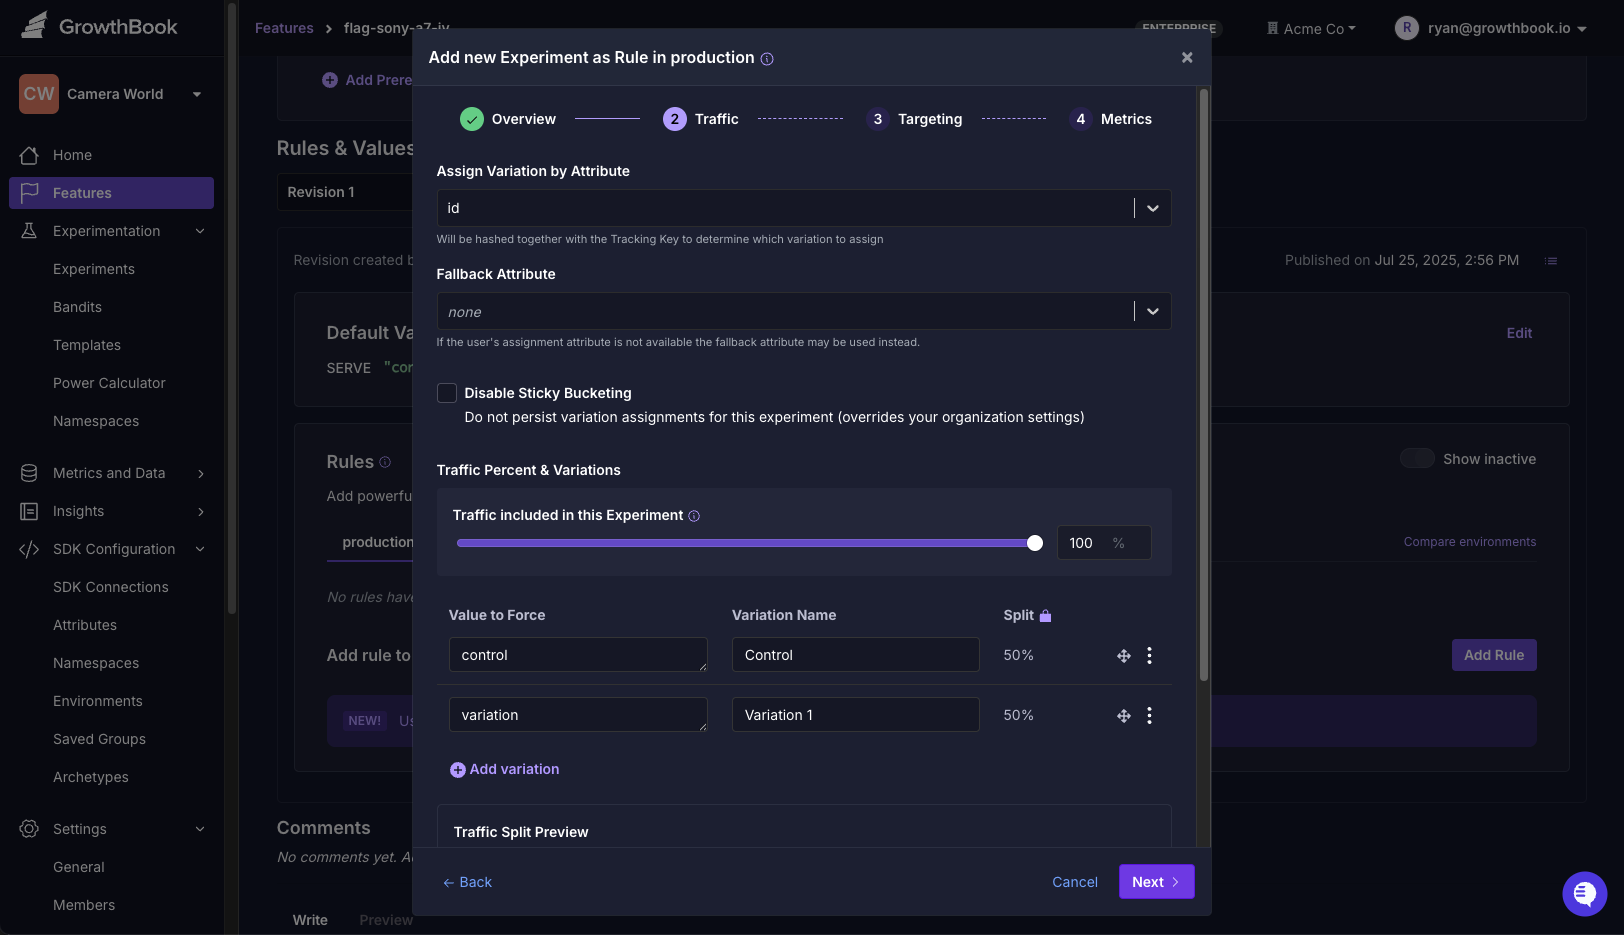
Create an Experiment
With the feature flag created, we can now create an experiment.
-
On the same page, scroll down to Rules and click Add Rule.
-
Select Experiment.
-
Configure your experiment:
- Name: "Sony A7 IV Experiment"
- Control: "control"
- Variation 1: "variation"
-
Complete remaining steps and save.
-
Click Review & Publish to launch the experiment.
Your experiment is now live! Before creating the content variations with Sanity, we'll need to create an API Key that allows Sanity to fetch the experiment content.
Create an API Key
- In GrowthBook, go to Settings → API Keys
- Click New Secret Key
- Add a description, like
Sanity API Key. - Set the role to readonly.
- Save and copy the API key for the next step.
Add Content Variations with Sanity
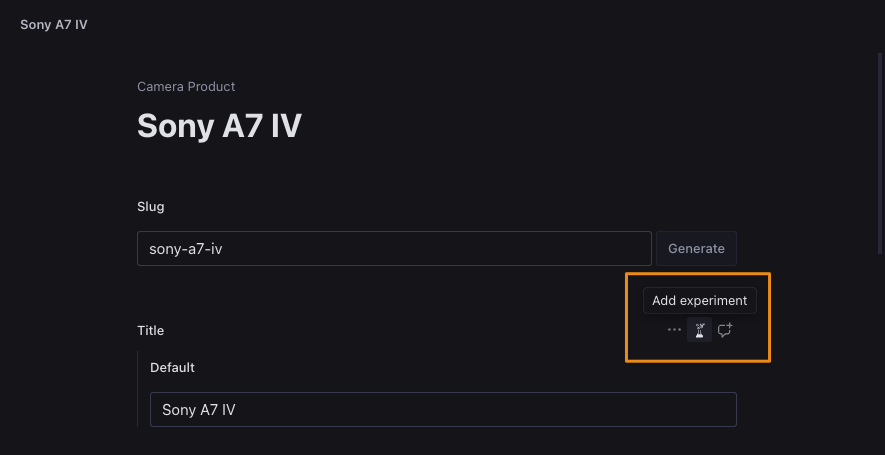
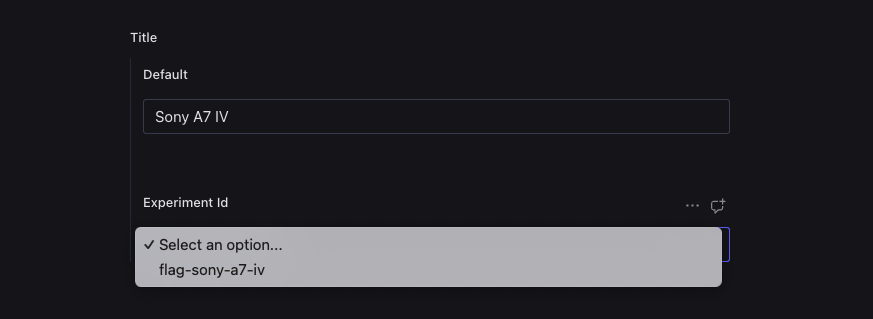
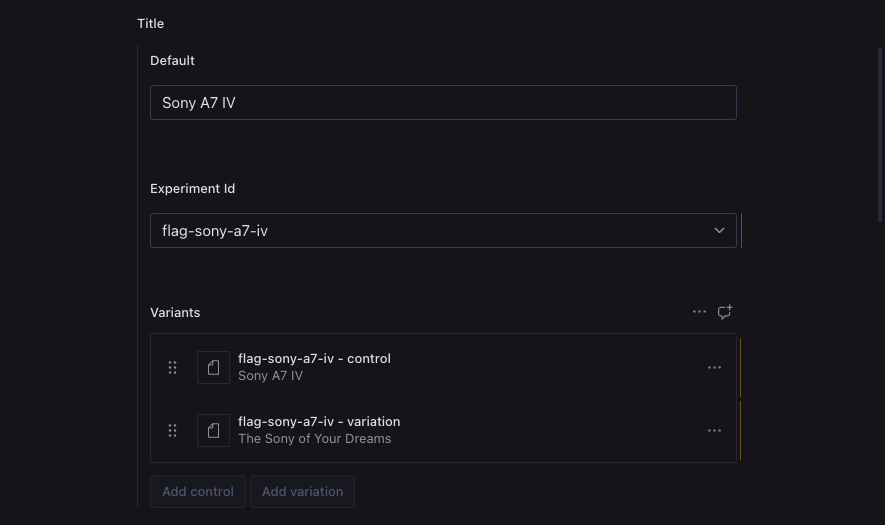
In Sanity Studio, we'll open the Camera Product document for the Sony A7 IV. While our control uses matter-of-fact language, the variation will be more exciting.
The first time you open document an experiment field, you'll be prompted to enter the API key you created in the previous step.
- Add your default content.
- Hover over the Title, Description, and Image fields to reveal an experiment (flask) icon.
- Click the experiment icon to open a dropdown where you can select the experiment you created in GrowthBook.
- Add content for each variation:
- Control: Your default content
- Variation: Alternative title/image to test
- Publish content!
Here's what the experiment fields look like in Sanity Studio:
Add GrowthBook to Your Next.js App
Now, let's integrate GrowthBook in your Next.js app to serve the appropriate content to the user.
Install GrowthBook
- npm
- Yarn
- pnpm
- Bun
npm install @growthbook/growthbook
yarn add @growthbook/growthbook
pnpm add @growthbook/growthbook
bun add @growthbook/growthbook
Configure GrowthBook for Server-Side Rendering
Create a new file, lib/growthbookServer.ts:
import { setPolyfills, configureCache } from "@growthbook/growthbook";

export function configureServerSideGrowthBook() {
  // Tag fetch requests so they can be revalidated on demand
  setPolyfills({
    fetch: (
      url: Parameters<typeof fetch>[0],
      opts: Parameters<typeof fetch>[1]
    ) =>
      fetch(url, {
        ...opts,
        next: {
          // Cache feature definitions for 1 minute
          // Implement SDK webhooks to revalidate on demand (see gb-revalidate route handler)
          revalidate: 60,
          tags: ["growthbook"],
        },
      }),
  });

  // Disable the built-in cache since we're using Next.js's fetch cache instead
  configureCache({
    disableCache: true,
  });
}
Configure Experiment Tracking
To track experiment exposures—which variations a users saw—we'll need to create a tracking component. Create a new file, lib/growthbookTracking.tsx.
Note the TODO comment. You'll need to replace the console.log with your own event tracking. Popular event tracking tools include Google Analytics, Segment, and Jitsu.
"use client";

import type { TrackingCallback, TrackingData } from "@growthbook/growthbook";
import { useEffect } from "react";

export const onExperimentView: TrackingCallback = (experiment, result) => {
  // TODO: Replace with your analytics service (Google Analytics, Segment, etc.)
  console.log("Viewed Experiment", {
    experimentId: experiment.key,
    variationId: result.key,
  });

  // Example: Google Analytics 4
  // if (typeof window !== 'undefined' && window.gtag) {
  //   window.gtag('event', 'experiment_view', {
  //     experiment_id: experiment.key,
  //     variant_id: result.key,
  //   });
  // }
};

// Helper component to track experiment views from server components
export function GrowthBookTracking({ data }: { data: TrackingData[] }) {
  useEffect(() => {
    data.forEach(({ experiment, result }) => {
      onExperimentView(experiment, result);
    });
  }, [data]);

  return null;
}
Update Middleware for Consistent User IDs
Create or update middleware.ts in your project root to ensure consistent experiment assignment.
import { NextResponse } from "next/server";
import type { NextRequest } from "next/server";

// Ensure a UUID cookie is always set to enable experimentation
export const GB_UUID_COOKIE = "gb-user-id";

export async function middleware(request: NextRequest) {
  // Generate a UUID if it doesn't exist yet
  let uuid = request.cookies.get(GB_UUID_COOKIE)?.value;
  let needsUpdate = false;
  if (!uuid) {
    uuid = crypto.randomUUID();
    needsUpdate = true;

    // Set the cookie on the current request
    request.cookies.set(GB_UUID_COOKIE, uuid);
  }

  // Forward the request to the server
  const response = NextResponse.next({
    request: {
      headers: new Headers(request.headers),
    },
  });

  // Add the newly created UUID to the response headers to persist in the browser
  if (needsUpdate) {
    response.cookies.set(GB_UUID_COOKIE, uuid);
  }

  return response;
}

// Run for all pages that need experiments
export const config = {
  matcher: [
    '/((?!api|_next/static|_next/image|favicon.ico|studio).*)',
  ],
};
Bring Everything Together in Your Next.js App
Now let's create a page that demonstrates the A/B testing functionality. It's a dynamic route that fetches the product data from Sanity and serves the appropriate content to the user. The relevant part of the template is highlighted in the code block below.
Create an Experiment Page
Edit app/[slug]/page.tsx:
// app/[slug]/page.tsx
import { GrowthBookTracking } from "@/lib/GrowthBookTracking";
import { configureServerSideGrowthBook } from "@/lib/growthbookServer";
import { sanityFetch } from "@/sanity/lib/live";
import { CAMERA_PRODUCT_QUERY } from "@/sanity/lib/queries";
import { urlFor } from "@/sanity/lib/sanityImageUrl";
import { GrowthBook } from "@growthbook/growthbook";
import { cookies } from "next/headers";
import { GB_UUID_COOKIE } from "@/middleware";
import Image from "next/image";
import { CAMERA_PRODUCT_QUERYResult } from "@/sanity.types";
type Props = {
params: Promise<{ slug: string }>;
};
const EXPERIMENT_FLAG = "flag-sony-a7-iv";
export default async function ProductPage({ params }: Props) {
// Helper to configure cache for next.js
configureServerSideGrowthBook();
// Create and initialize a GrowthBook instance
const gb = new GrowthBook({
clientKey: process.env.GROWTHBOOK_CLIENT_KEY,
enableDevMode: true,
});
await gb.init({ timeout: 1000 });
// Set targeting attributes for the user
const cookieStore = await cookies();
await gb.setAttributes({
id: cookieStore.get(GB_UUID_COOKIE)?.value || "",
});
// Evaluate any feature flags
const variation = gb.getFeatureValue("flag-sony-a7-iv", "default");
// Get tracking data for experiments
const trackingData = gb.getDeferredTrackingCalls();
const queryParams = {
slug: (await params).slug,
titleExperiment: EXPERIMENT_FLAG,
titleVariant: variation,
descriptionExperiment: EXPERIMENT_FLAG,
descriptionVariant: variation,
imageExperiment: EXPERIMENT_FLAG,
imageVariant: variation,
};
const { data } = await sanityFetch({
query: CAMERA_PRODUCT_QUERY,
params: queryParams,
}) as { data: CAMERA_PRODUCT_QUERYResult };
// Cleanup
gb.destroy();
if (!data) {
return (
<div className="min-h-screen bg-gray-50 flex items-center justify-center">
<div className="text-center">
<h1 className="text-2xl font-bold text-gray-900 mb-2">
Product Not Found
</h1>
<p className="text-gray-600">
The camera you're looking for doesn't exist.
</p>
</div>
</div>
);
}
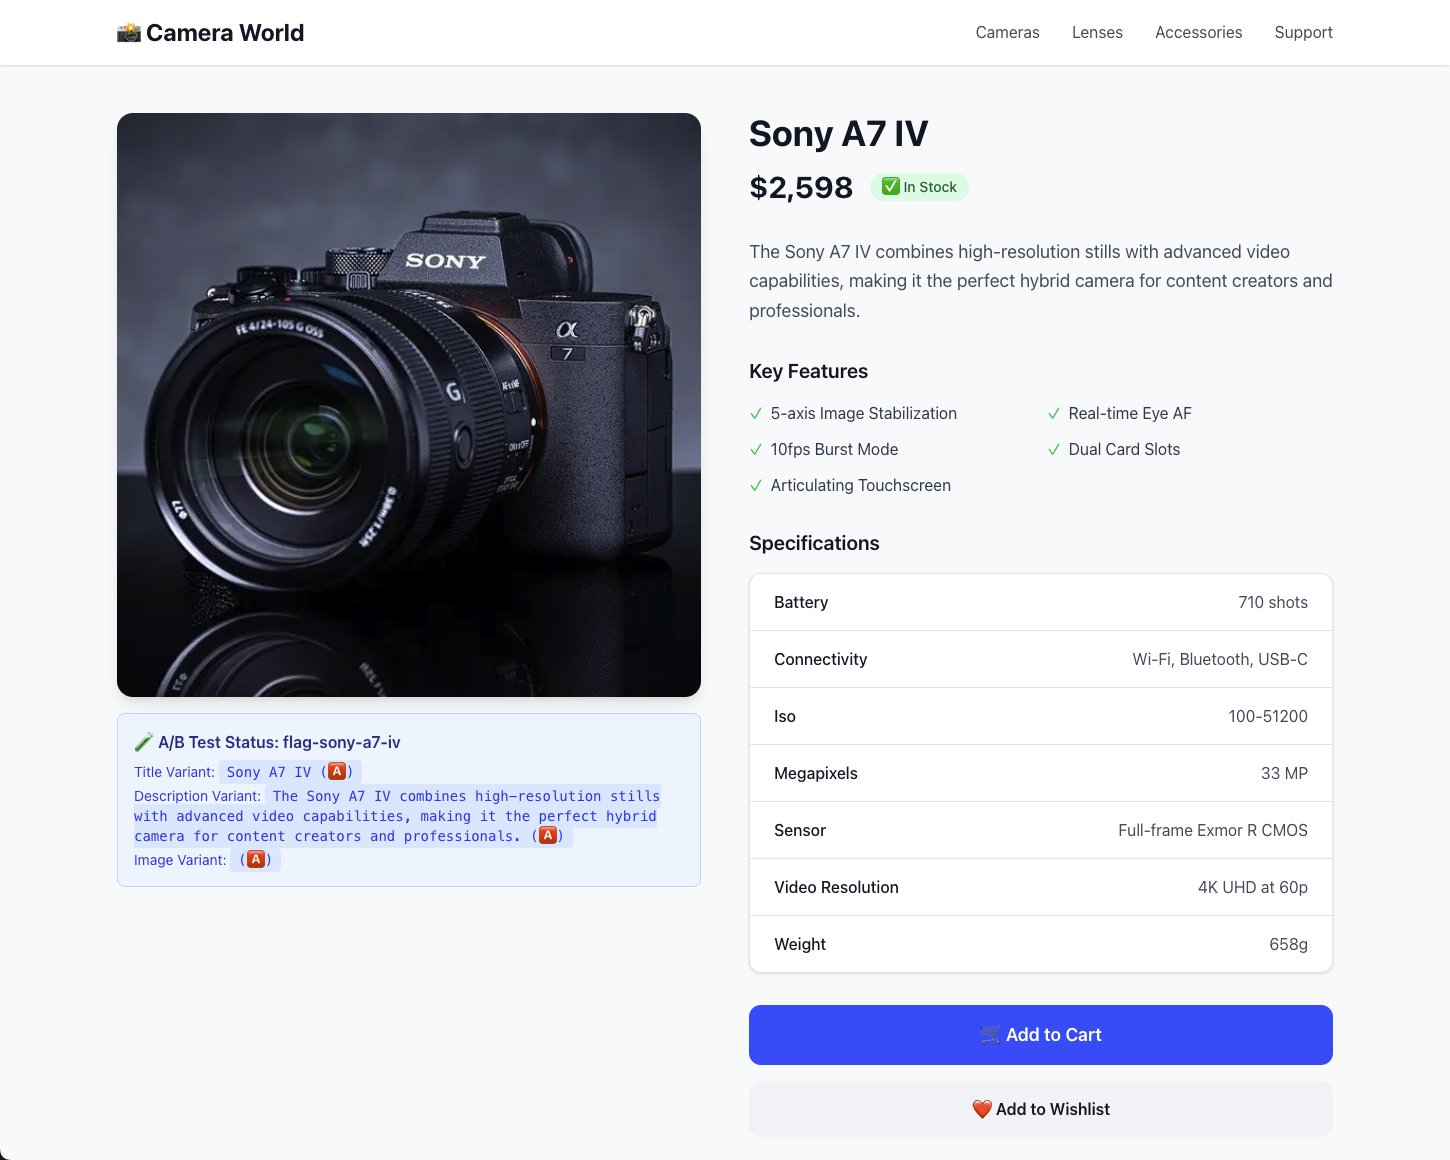
return (
<div className="min-h-screen bg-gray-50">
{/* Header */}
<header className="bg-white shadow-sm border-b">
<div className="max-w-7xl mx-auto px-4 sm:px-6 lg:px-8 py-4">
<div className="flex items-center justify-between">
<h1 className="text-2xl font-bold text-gray-900">
📸 Camera World
</h1>
<nav className="hidden md:flex space-x-8">
<a href="#" className="text-gray-600 hover:text-gray-900">
Cameras
</a>
<a href="#" className="text-gray-600 hover:text-gray-900">
Lenses
</a>
<a href="#" className="text-gray-600 hover:text-gray-900">
Accessories
</a>
<a href="#" className="text-gray-600 hover:text-gray-900">
Support
</a>
</nav>
</div>
</div>
</header>
{/* Product Content */}
<main className="max-w-7xl mx-auto px-4 sm:px-6 lg:px-8 py-12">
<div className="grid grid-cols-1 lg:grid-cols-2 gap-12">
{/* Product Image */}
<div className="space-y-4">
<div className="aspect-square bg-white rounded-2xl shadow-lg overflow-hidden">
{data.image ? (
<Image
src={urlFor(data.image)?.url()}
alt={data.title || "Camera Image"}
className="w-full h-full object-cover"
width={800}
height={800}
/>
) : (
<div className="w-full h-full bg-gray-200 flex items-center justify-center">
<span className="text-gray-400 text-6xl">📷</span>
</div>
)}
</div>
{/* A/B Test Info (for demo purposes) */}
<div className="bg-blue-50 border border-blue-200 rounded-lg p-4">
<h3 className="font-semibold text-blue-900 mb-2">
🧪 A/B Test Status: {EXPERIMENT_FLAG}
</h3>
<div className="text-sm text-blue-700 space-y-1">
<div>
Title Variant:{" "}
<span className="font-mono bg-blue-100 px-2 py-1 rounded">
{data.title} ({variation === "variation" ? "🅱️" : "🅰️"})
</span>
</div>
<div>
Description Variant:{" "}
<span className="font-mono bg-blue-100 px-2 py-1 rounded">
{data.description} ({variation === "variation" ? "🅱️" : "🅰️"})
</span>
</div>
<div>
Image Variant:{" "}
<span className="font-mono bg-blue-100 px-2 py-1 rounded">
({variation === "variation" ? "🅱️" : "🅰️"})
</span>
</div>
</div>
</div>
</div>
{/* Product Details */}
<div className="space-y-8">
{/* Title and Price */}
<div>
<h1 className="text-4xl font-bold text-gray-900 mb-4">
{data.title}
</h1>
<div className="flex items-center space-x-4">
<span className="text-3xl font-bold text-gray-900">
${data.price?.toLocaleString()}
</span>
{data.inStock ? (
<span className="inline-flex items-center px-3 py-1 rounded-full text-sm font-medium bg-green-100 text-green-800">
✅ In Stock
</span>
) : (
<span className="inline-flex items-center px-3 py-1 rounded-full text-sm font-medium bg-red-100 text-red-800">
❌ Out of Stock
</span>
)}
</div>
</div>
{/* Description */}
<div>
<p className="text-lg text-gray-600 leading-relaxed">
{data.description}
</p>
</div>
{/* Key Features */}
{data.features && data.features.length > 0 && (
<div>
<h3 className="text-xl font-semibold text-gray-900 mb-4">
Key Features
</h3>
<div className="grid grid-cols-1 sm:grid-cols-2 gap-3">
{data.features.map((feature, index) => (
<div key={index} className="flex items-center space-x-2">
<span className="text-green-500">✓</span>
<span className="text-gray-700">{feature}</span>
</div>
))}
</div>
</div>
)}
{/* Technical Specifications */}
{data.specs && (
<div>
<h3 className="text-xl font-semibold text-gray-900 mb-4">
Specifications
</h3>
<div className="bg-white rounded-xl shadow-sm border border-gray-200 overflow-hidden">
<div className="divide-y divide-gray-200">
{Object.entries(data.specs).map(
([key, value]) =>
value && (
<div
key={key}
className="px-6 py-4 flex justify-between"
>
<span className="font-medium text-gray-900 capitalize">
{key.replace(/([A-Z])/g, " $1").trim()}
</span>
<span className="text-gray-600">{value}</span>
</div>
)
)}
</div>
</div>
</div>
)}
{/* Purchase Button */}
<div className="space-y-4">
<button
className="w-full bg-blue-600 hover:bg-blue-700 text-white font-semibold py-4 px-8 rounded-xl transition-colors duration-200 text-lg"
disabled={!data.inStock}
>
{data.inStock ? "🛒 Add to Cart" : "Out of Stock"}
</button>
<button className="w-full bg-gray-100 hover:bg-gray-200 text-gray-900 font-semibold py-4 px-8 rounded-xl transition-colors duration-200">
❤️ Add to Wishlist
</button>
</div>
</div>
</div>
</main>
{/* Footer */}
<footer className="bg-white border-t mt-16">
<div className="max-w-7xl mx-auto px-4 sm:px-6 lg:px-8 py-12">
<div className="text-center text-gray-600">
<p>© 2025 Camera World. All rights reserved.</p>
<p className="mt-2 text-sm">A GrowthBook + Sanity + Next.js Demo</p>
</div>
</div>
</footer>
<GrowthBookTracking data={trackingData} />
</div>
);
}
Testing Your Setup
With your Next.js app running, you can now test the A/B testing functionality.
Visit the app in your browser to see which variation is being served. Even when you refresh the page, the same variation will be served to the user.
Check your console to see debug info.
Next Steps
- Add Event Tracking: Replace the
console.logwith your analytics service (Google Analytics, Segment, etc.) See docs for more details. - Add Metrics: Add metrics to your experiment to track conversions, revenue, etc.
- Configure Webhooks: Set up GrowthBook webhooks to revalidate your Next.js cache when experiments change
Troubleshooting
- No variations showing: Check that your GrowthBook client key is correct and the experiment is published.
- Console errors: Check that all environment variables are set correctly.
- Other issues: Restart your Next.js app and open an incognito window to test.
This setup provides a foundation for content-driven A/B testing with Sanity and GrowthBook. The integration allows content creators to manage experiment variations directly in Sanity Studio while developers control the experiment logic through GrowthBook.